
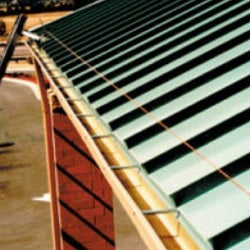
ColorGard Installation
Installation of the ColorGard System is straightforward and only requires a few basic tools to complete.
Tape Measure
Hacksaw with metal cutting blade
18V Cordless Screw gun (don’t use an impact driver)
Metric wrenches, socket set or adjustable wrench
String line (wire suggested for longer runs)
Step 1: Setting a Straight Line
Colorgard is easy to install with a little care and attention to detail.
The first step is to set an S-5! seam clamp at each end of the roof area to be protected with ColorGard. Clamps should be set at least 6″ from the eave, but no more than 12″.
Once the clamps are located and secured, attached a string line to both ends and pull it tight. All other clamps will use the string line for alignment, so you don’t want sags in the string.
S-5! mini clamps should never be used with ColorGard systems.

Step 2a: Preparing the clamps for Pre-Punched ColorGard
If you are installing pre-punched ColorGard, plan your S-5! seam clamp installation with the top (mounting hole) on the downslope end of the clamp. After the ColorGard has been installed, it should look like the photo to the left.
Before installing the clamps, prepare them by loading the set screws into the appropriate holes, taking care to make sure all S-5! clamps will be oriented the same way when installed and the top mounting bolt will be on the downslope side as pictured.
S-5! mini clamps should never be used with ColorGard systems.

Step 2b: Preparing the clamps for Un-Punched ColorGard
If you are installing un-punched ColorGard, plan your S-5! seam clamp installation with the top (mounting hole) on the upslope end of the clamp. After the ColorGard crossmember & VersaClip has been installed, it should look like the photo to the left.
Before installing the clamps, prepare them by loading the set screws into the appropriate holes, taking care to make sure all clamps will be oriented the same way when installed and the top mounting bolt will be on the upslope side as pictured.
S-5! mini clamps should never be used with ColorGard systems.

Step 3a: Position the Seam Clamps
Using the string line as a guide and making sure all of the S-5! seam clamps are oriented the same way, position the prepared clamps and snug the setscrews down using an 18V cordless screw gun. DO NOT USE AN IMPACT DRIVER.
Always use the provided allen-driver bit that is included in the boxes with your S-5! clamps. If the set screw is too close the flat of the roof panel to safely operate the screw gun, use an angle driver adapter.
Once satisfied with the clamp locations, using your screwgun, tighten the set screws.
S-5! mini clamps should never be used with ColorGard systems.
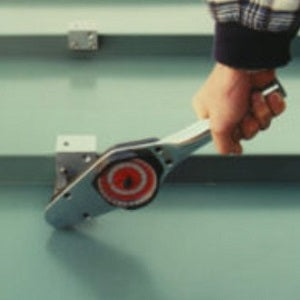
Step 3b: Check the Set Screw Torque
Check the set screw torque use a dial type inch/lb torque wrench to ensure it is within specifications for your particular roof panel and seam clamp configuration.
Generally, set screw torque will be between 115-175 inch/lbs, but this can vary with different panel/clamp assemblies. Call us with your panel/clamp info and we will provide that information.
Note: Over-torquing can damage the clamp threads and lead to system failure.
S-5! mini clamps should never be used with ColorGard systems.

Step 4: Optional – Insert Color Strip
At your option, you can insert a 2″ wide strip of painted metal (usually sourced from same material as the metal roof for a perfect color match) into the face of the ColorGard crossmember.
This is easiest to do on the ground before installation but can be accomplished at a later date if desired.
Once the color strip is installed, crimp the corner of the ColorGard extrusion with pliers to keep the color strip from moving.
S-5! mini clamps should never be used with ColorGard systems.

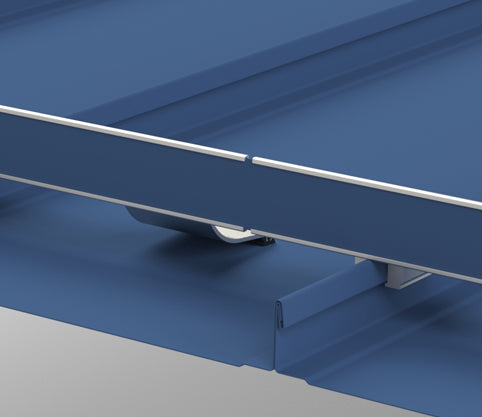
Step 5: Mount the ColorGard Crossmember
Pre-Punched ColorGard: Place the crossmember on the clamps, making sure it is facing downslope (see the images in step 2) and bolt to each S-5! clamp using a box-end wrench or ratchet.
Un-Punched Colorgard: slide an appropriate number of VersaClips onto the back leg of the crossmember and adjust them to line up with the S-5! clamps (see images in Step 2 for correct placement), then bolt to the clamps using a box-end wrench or ratchet.
Torque for these bolts should be 20 foot/lbs.
Use the provided splices between each adjacent section of ColorGard.
S-5! mini clamps should never be used with ColorGard systems.
Products
-
Example product title
Regular price $19.99Regular priceUnit price per -
Example product title
Regular price $19.99Regular priceUnit price per -
Example product title
Regular price $19.99Regular priceUnit price per -
Example product title
Regular price $19.99Regular priceUnit price per
Industry Leader in Metal Roofing Attachments.
S-5! stays on top of the trends in the metal industry to provide the right products to fit virtually any metal roof profile. S-5! have developed clamps and brackets to support solar and utility installations, along with a top-of-the-line snow retention system to support and protect your metal roof investment.


